Posts

Showing posts from August, 2011

Clean Unwanted space in C drive

Image
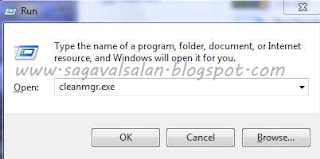
How to Clean Unwanted space in C drive The Steps for this is so simple and You get a lot of space. Press win key + r [ run ] Type cleanmgr.exe   Press ok In the next dialogue box, select C drive. Select the things You want to delete in the next dialogue box. No harm occurs to your computer while selecting all things shown there. Here a less memory is shown for recovering because I did the process yesterday. Space is not a problem for new users with new PC in front of them, but for old system Space is always a problem. So try this.

How to change boot animation in Windows 7?

Image
Change boot animation in Windows 7 For changing Your windows booting animation, Download the software Win boot [ Click Here ] You can Use both still image and animated graphics by clicking the tab under Animation NB: For animation You want files of .bmp, .gif extentions [You need sequence of picture to make animation. Animations already in .gif format is not supported]. Make the files in a folder and select the folder to make the animation. [max 150 frames] You can change messages shown by selecting the message editing tab. You can change Screen  for Resuming windows [After sleep] by clicking Resume tab   Check How to change Logon Screen [ Click Here ]

How to change logon screen of windows 7

Image
Change logon screen of windows 7 Download Tweakslogon [ Click Here ] This software enables You to change Your Logon screen simply. Click on Change Logon screen and select a picture to change You Can test Your new sreen by clicking test button. So simple... Check How to change Boot Animation [ click here ] Happy Learning...

Enable Hidden themes of Windows 7

Image
How To Enable Themes which are hidden in Windows 7? Windows 7 has some hidden themes which are specific to some countries. It is hidden when You install Windows7 To enable it Type    C:\Windows\Globalization\MCT      in Your title bar and press Enter. You will see 5 folders Double click the theme file inside it. Happy Learning...

Change Data Execution Prevention settings

Image
How to Change Data Execution Prevention If you want to turn off DEP for a program you trust, first check to see if the software publisher has made a DEP-compatible version of the program or made an update available before you change any DEP settings. If an update or DEP-compatible version is available, we recommend installing it and leaving DEP turned on so you can benefit from the protection it can provide. But if the publisher has not released an updated, DEP-compatible version of the program, you can turn off DEP for the program. You'll be able to use the program, but it might be vulnerable to an attack that could spread to your other programs and files. 1.       Control Panel\System and Security\System    OR right click Computer and select properties[Windows 7] 2.       Click advanced system settings .   If you are prompted for an administrator password or confirmation, type the password or provide confirmation. 3.       Under Performance , click Settings

What is Data Execution Prevention?

Data Execution Prevention? Data Execution Prevention (DEP) is a security feature that can help prevent damage to your computer from viruses and other security threats. Harmful programs can try to attack Windows by attempting to run (also known as execute ) code from your computer's memory reserved for Windows and other authorized programs. These types of attacks can harm your programs and files. DEP can help protect your computer by monitoring your programs to make sure that they use computer memory safely. If DEP notices a program on your computer using memory incorrectly, it closes the program and notifies you. If you need information about how to turn off DEP for a program you trust, see Change Data Execution Prevention settings.

What is CMOS?

Image
What is CMOS?   Complementary metal-oxide semiconductor, or CMOS , typically refers to a battery-powered memory chip in your computer that stores startup information. Your computer's basic input/output system (BIOS) uses this information when starting your computer. CMOS-related error messages could be caused by a faulty or discharged battery. The battery can become discharged if your computer has been turned off for a very long time. To resolve CMOS-related errors, check the information that came with your computer or contact your computer manufacturer. Because your CMOS settings are specific to your computer's hardware, Microsoft can't provide specific instructions for changing them.

FACING POWER FAILURE WHILE DOING IMPORTANT WORKS? HERE IS THE SOLUTION….

Image
  One day, when I was exporting a long video, the main power gone and the fact was that, my UPS won’t get backup for that long time to complete that exporting. Then I tried SLEEP MODE. WELL…. It’s a great technique. Let’s go deeply…. Suppose while you are doing a heavy work like Exporting large videos, writing a disc*, copying large file……. If the power is gone, you will lose all your data. But Try this technique… When the main power gone, press your sleep key [if using a multimedia keyboard. Otherwise go to START >>Hit the arrow in Shutdown tab in WINDOWS 7 >>> select SLEEP, Don’t remember where the sleep key is actually in WINDOWS XP ] When Your PC become OFF, Power off Your UPS. DONE… When main Power comes back, Just switch on your UPS. It will switch on your whole PC. WINDOWS will show you ‘RESUMING WINDOWS’ in the place of ‘STARTING WIDOWS’. You will go through black screen which blink 3-4 times and reach login screen. Then same process continues.  Then Windows

How To enable/disable USB port in windows XP ,Windows vista, Windows7 and 2000

Image
How To enable/disable USB port in windows XP ,Windows vista, Windows7 and 2000. It's Easy way and You can restrict USB access to Your system to avoid un-authorised use. Step 1st: Click Start then click on Run. or press win key + R step 2nd:  One box prompted, then type regedit in that box , and then click OK   Step 3rd: Find and Locate the following registry key: HKEY_LOCAL_MACHINE >SYSTEM >CurrentControlSet >Services >USBSTOR   Step 4th: In the right side, you have to find Start then double-click on Start.   Step 5th: In the Start Value data box, type 4 click Hexadecimal (if it is not already selected), and then click OK and now quit Registry Editor.   ENABLE USB PORT: Repeat the above steps upto 4, then In the Start Value data box, type 3 click Hexadecimal (if it is not already selected), and then click OK and now quit Registry Editor.

Trick To Get Back Old Facebook Chat In Firefox Browser

Image
Trick To Get Back Old Facebook Chat In Firefox Browser Download  Greasemonkey addon by Clicking here Restart your browser Install the Facebook Sidebar Chat Revision Script By Clicking Here ( Click on install button at Top-Right---below pic ) Trick To Get Back Old Facebook Chat In Firefox Browser Google chrome by default supports user-scripts so you don’t need Greasemonkey addon Install the Facebook Sidebar Chat Revision Script By Clicking Here ( Click on install button at Top-Right ) HAPPY LEARNING...