How to install adroid apps in PC without Bluestack or Youwave [How to setup Android x86 using virtualbox]
How to install adroid apps in PC without Bluestack or Youwave [How to setup Android x86 using virtualbox]
Like and share our page Technology Reveals Here
Here i am describing, how you can install Android [any version-Upto kitkat is available] on your PC without installing emulators like Bluestack, Youwave.
Here the things you needed are
2.Android-x86-4.4-r2 [Torrent]
NB: You need any torrent donloading software [u torrent] [Bit torrent] before using the torrent link. Magnetic links are provided here
NB: You need any torrent donloading software [u torrent] [Bit torrent] before using the torrent link. Magnetic links are provided here
Download both files, then install Virtual box and open it. You will see this.
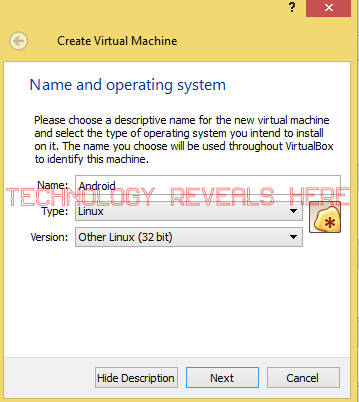
*Click on New*Type a name for your device, select type LINUX and version Other Linux 32 bit
*Select RAM memory you want, am using 1024 MB
*Select Create Virtual hard drive now
*Select the option VDI
*Select Dynamically allocated
*Click Create
*Now Select te device you created and click Start
*Click the rounded icon and select the Android x86 iso file you downloaded
[NB: If you have problem with this step use any virtual drive and select that drive from the drop down after the image file is loaded in virtual drive-- right click and click mount in virtual drive]
[Virtual drives : Virtual clone, Daemon tools]
*Then click Start
NB: You can't see mouse pointer inside VirtualBox. To see Mouse pointer use key combination [right Ctrl + I--- or click on machine and select turnoff mouse integration] then to see mouse pointer in our pc (outside VirtualBox) press right 'Ctrl' again.If you see a box like below in this process ,then tick Do not show again and press capture.
*Select Install Android-x86 to harddisk
*Select Run Android [Press Enter]
Steps continue below...
*Skip the step to setup WiFi
*Select Yes to add google account. Enter your ID an Password
*It shows waring to use browser sign-in, For that press NEXT and give the OTP if you set OTP for your account.
*Here you see You android Home Screen
*Select Create Virtual hard drive now
*Select the option VDI
*Select Dynamically allocated
*Click Create
*Now Select te device you created and click Start
*Click the rounded icon and select the Android x86 iso file you downloaded
[NB: If you have problem with this step use any virtual drive and select that drive from the drop down after the image file is loaded in virtual drive-- right click and click mount in virtual drive]
[Virtual drives : Virtual clone, Daemon tools]
*Then click Start
NB: You can't see mouse pointer inside VirtualBox. To see Mouse pointer use key combination [right Ctrl + I--- or click on machine and select turnoff mouse integration] then to see mouse pointer in our pc (outside VirtualBox) press right 'Ctrl' again.If you see a box like below in this process ,then tick Do not show again and press capture.
*Select Install Android-x86 to harddisk
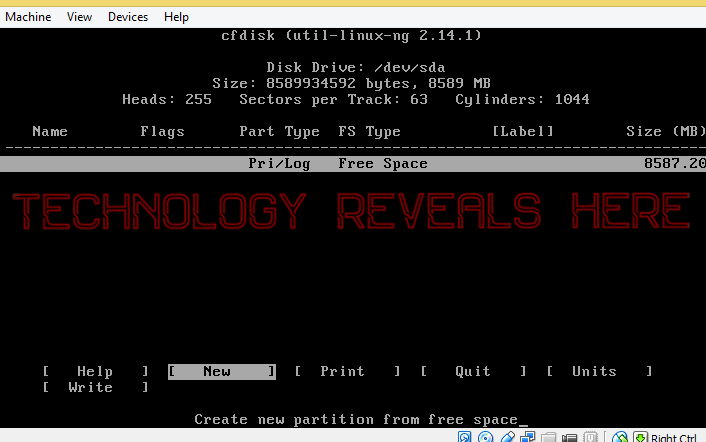
*Select Create/Modify partition
*Use arrow keys to select NEW
*Then select Primary
*Use arrow key to select Bootable [Press enter key for select] and then Write
*It will show a warning to write Partition. Type yes and hit Enter
*Select sda1 [Selected in default-press Enter]
*Select Filesystem as ext3
*Select Yes for the confirmation
*Select Yes for Install Boot loader confirmation
*If you are not planning to do debugging as a programmer, select NO
*Select Run Android [Press Enter]
Steps continue below...
Like and share our page Technology Reveals Here
*It starts android. Select language and press the arrow
*Skip the step to setup WiFi
*Select Yes to add google account. Enter your ID an Password
*It shows waring to use browser sign-in, For that press NEXT and give the OTP if you set OTP for your account.
*Here you see You android Home Screen


Comments
Post a Comment